
Welcome back
You’re no longer part of this team
Your Lexi hasn’t changed. You keep your number, your conversations and this login, and she carries on answering exactly as before.
What’s gone is your access to their contacts, their calendar and their back office.
Nothing changes for you — keep working exactly as you are. To carry on with Lexi as your own, just reply to the email we sent you.
Talk to Lexi
Talking to Lexi uses your account minutes, just like a phone call.
Things Lexi made for you
Everything Lexi has written for you — tap any one to open it.
Your ideal customer
Let’s get more of your best customers.
You already know who your best customer is — the one you’d happily take a hundred more of. There are plenty more of them out there.
Getting them is about narrowing your aim, not widening it. The riches are in the niches: when a message is built for your ideal customer, more of those folks put their hands up. Aim at everybody and you land with nobody.
Spend five minutes with Lexi — she asks, you answer — and from then on she goes after those people in every text, email and call she sends.
Stop whenever you like — she keeps what you’ve already given her.
In your own words — who are they, what do they need, and what makes them a good fit for you? A few sentences is plenty.
Connect QuickBooks
Your books already know every job you’ve ever done. Let Lexi read them and she can chase the work that’s due — without you exporting a thing.
Checking…
One moment.
What Lexi can and cannot do in your books.
She reads your customer list and your past invoices, and nothing else. She cannot create an invoice, take a payment, change a price, or delete anything. You can cut her off from inside QuickBooks whenever you like.
My business
Your IRS letter
One document, once. Send it and Lexi’s texting gets switched on — without it the phone carriers won’t register your number at all.
Which letter?
The one the IRS sent when they gave you your EIN. It’s headed CP 575 — or 147C if you asked them for a replacement. Some accountants call it your SS-4.
A photo of it on your desk is fine. It doesn’t need to be a scan, and it doesn’t need to be flat.
A photo or a PDF, under 8MB. Can’t find it? Ask Lexi and she’ll tell you how to get a copy from the IRS.
The full list
Put your team to work
Nine specialists, all Lexi. Tap one and she's on it.
Your team
Every rep gets their own Lexi, their own number and their own leads.
See who’s on your team
Add a team member
Train & Customize Lexi
The more she knows about your business, the better she sounds on the phone.
Nothing yet. Whatever you give her shows up here.
Add your contacts
That list of old customers you keep meaning to call? Give it to Lexi and she'll start calling and texting them for you.
A spreadsheet or CSV, up to 10MB. Messy is fine.
Add your past invoices
An export from QuickBooks, Square, Jobber — whatever you bill with. It's how she knows who your best customers are and what they're worth.
A spreadsheet or CSV, up to 10MB. It just needs a date, a name and an amount — messy is fine.
Teach Lexi about your business
Your price list, your services, the questions you're always answering — anything you'd hand a new employee on their first day.
PDFs, Word docs, spreadsheets and photos, up to 10MB each. Pick as many as you like.
Billing & Payment
Manage the card Lexi uses, and see exactly what you're being charged.
Your Lexi balance
Lexi draws from this as she works — calls, texts, and emails.
Payment method
This is the card Lexi uses for your monthly plan and usage.
Account Settings
Your account details and sign-in.
Need to change your business details? Edit them below — or just ask Lexi in chat and she'll take care of it.
Tap any card to edit. Lexi uses the new details right away.
We'll email you a secure link to set a new password.
Your account is scheduled to close
Lexi keeps working normally until then — nothing changes before this date.
Cancel your account
You'll keep full access through the end of your current billing cycle, and your files stay yours.
Business info
Lexi reads your website to learn your business, so keep this one right.
Business address
Change any part and fill in the whole address.
Hours and time zone
These two decide when Lexi offers appointments, so they save together.
e.g. Mon–Fri 9am–5pm, Sat 10am–2pm, closed SunPlease include am or pm.
Putting callers through
When a caller wants to speak to a person right now, Lexi can put them straight through to you. Leave it off and she takes a message instead.
Whoever answers this number takes the call. If nobody picks up, Lexi comes back and takes a message.
Message alerts
When Lexi takes a message for you, this is how she passes it on.
Both is the safest. Every message is saved either way, so nothing is ever lost.
Your morning briefing
Start every day already knowing where you stand — who’s coming in, who’s gone quiet, and where the money is sitting. Tell Lexi where to send it and it’ll be waiting for you in the morning.
Feel free to change this to a different email if you’d like. It only moves your briefing — everything else from Lexi keeps coming to your usual address.
Enter your cell number here and you’ll have read your whole day before your coffee goes cold. Skip it and the email still comes on its own.
How Lexi sounds
Her tone with your customers, and anything she should always or never do.
Getting set up
Lexi's already picking up your calls. Three quick things and she's running the whole show.
Getting set up
Lexi's already picking up your calls. Two quick things and she's running the whole show.
Your back office
This is your company's account, and you have your own login to it. Every lead, conversation and appointment that comes to you lands there. It's already running — there's nothing for you to set up.
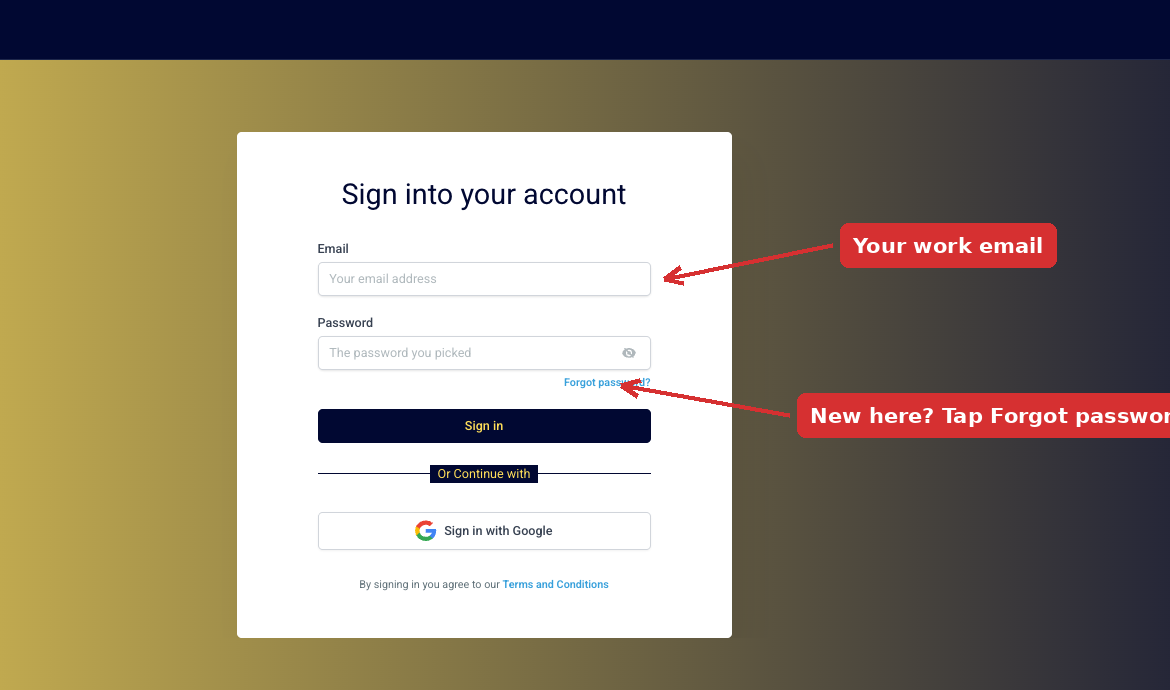
Log in at app.getlexiai.com
Your username is your work email — the same address you signed in with here.
 Open your back office
You choose your own password — we never see it. On the login page use Forgot password with your work email, and it'll walk you through setting one and take you straight in.
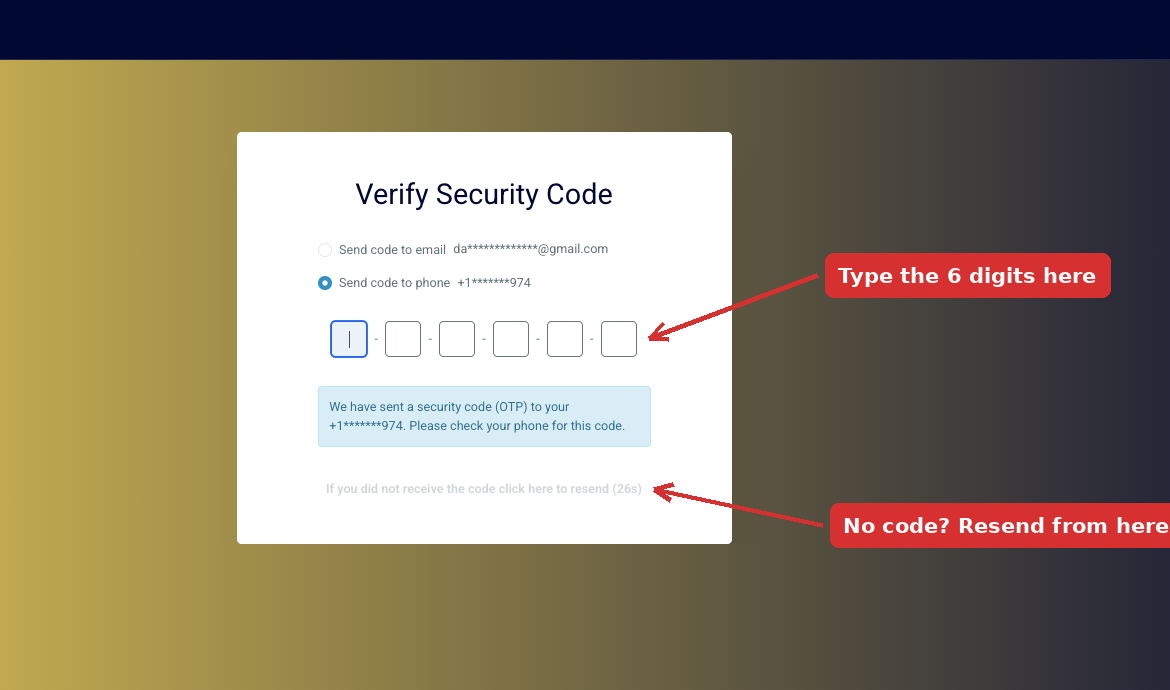
After your password you'll be asked for a 6-digit code, and you pick where it's sent — your email or your phone. This happens on every login, not just the first one. It's how the platform works and it can't be switched off — nothing is wrong with your account.

Three places are worth knowing:
- Conversations — every call, text and email, as it happens.
- Contacts — the people assigned to you.
- Calendar — what Lexi has booked in for you.
Ignore the rest. Most of it is your company's machinery and not yours to touch.
Your back office
We built you a back office when you signed up. Every lead, conversation and appointment lands there. It's already running — there's nothing to set up.
Log in at app.getlexiai.com
Your username is the email address you signed up with. Your password was shown on your setup page when you first joined.
Open your back office
After your password you'll be asked for a 6-digit code, and you pick where it's sent — your email or your phone. This happens on every login, not just the first one. It's how the platform works and it can't be switched off — nothing is wrong with your account.
Use Forgot password on the login page with the email you signed up with. It'll let you set a new one and take you straight in. We can't show it to you here — we don't keep a readable copy of it anywhere.
Three places are worth knowing:
- Conversations — every call, text and email, as it happens.
- Contacts — everyone Lexi has spoken to.
- Calendar — what she's booked in.
Ignore the rest. Most of it is machinery you'll never need to touch.
Connect your calendar
Your booking calendar is already built and Lexi is already using it. This step links it to the calendar you personally live in — Google, Outlook, or iCloud — so she can see when you're genuinely busy.
What this gives you
Once your calendar is connected, Lexi can see everything you already have on. She books around your existing commitments, and anything she books lands in your calendar straight away — one place to look, always right.
In your back office, scroll to the very bottom of the left menu and click Settings. It's the last item, below everything else.
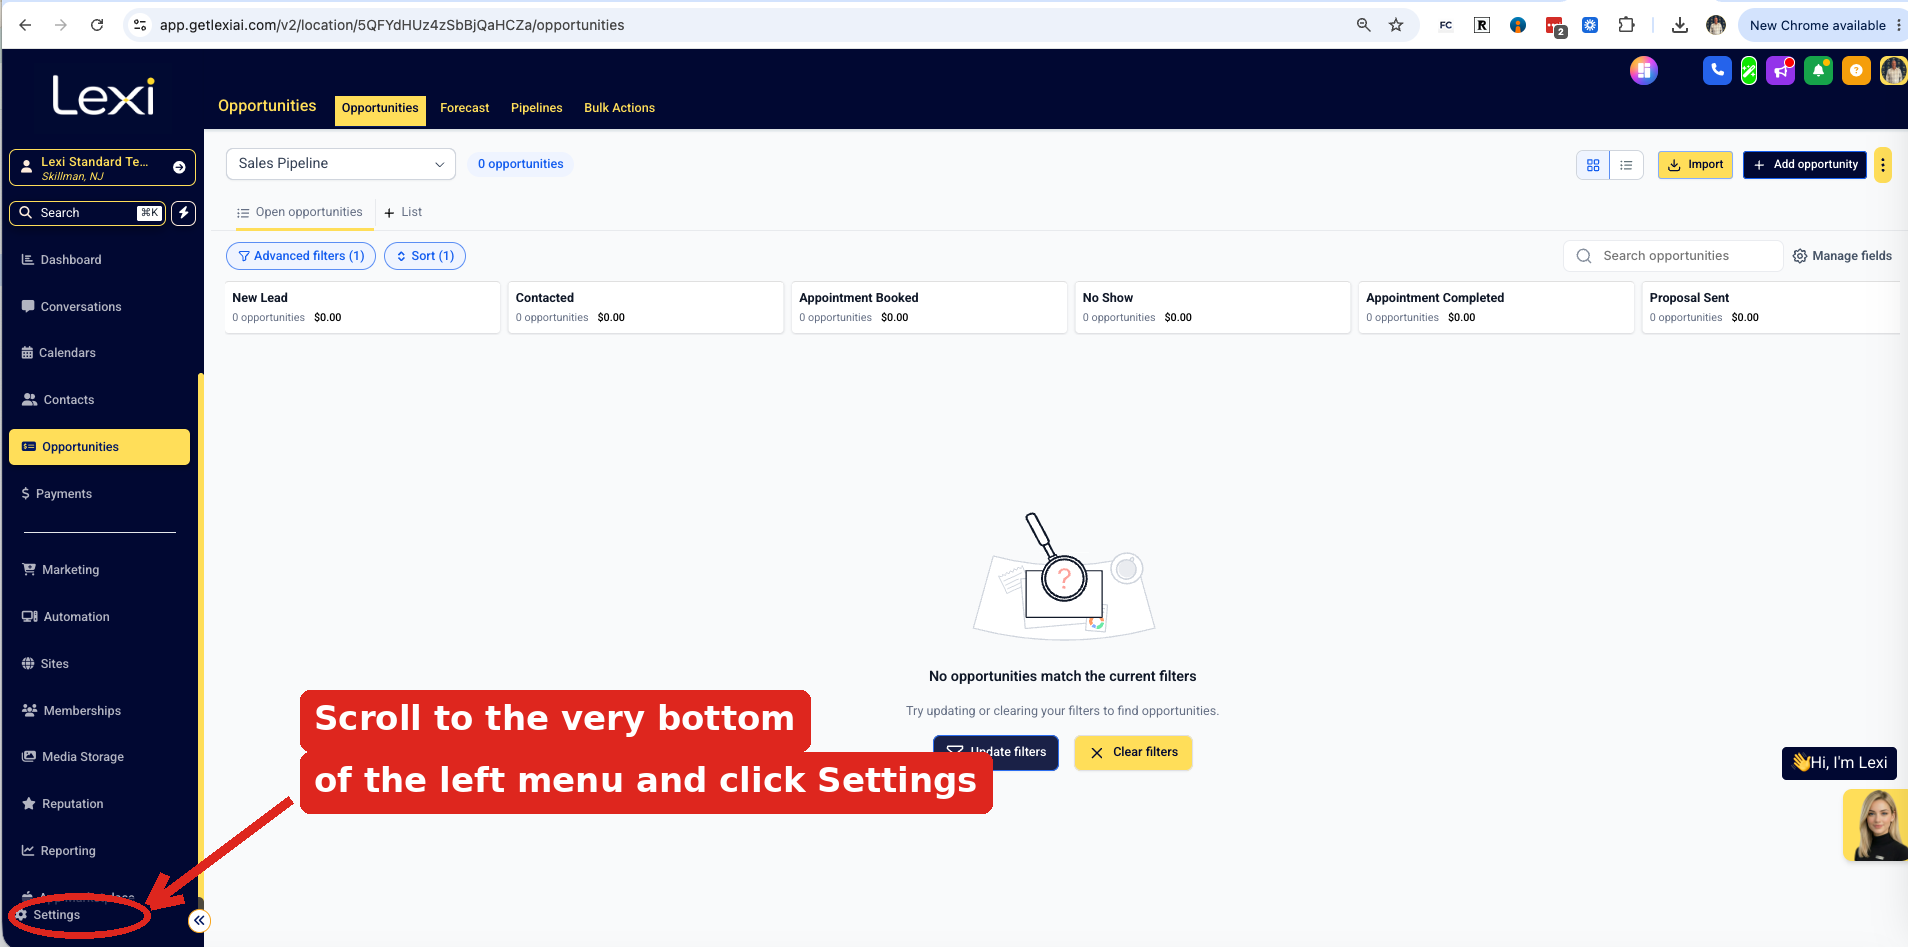 Tap to enlarge · Settings sits at the very bottom of the left menu
In your back office, go to Settings → My Profile. Scroll to Calendar Settings and click + Add New.
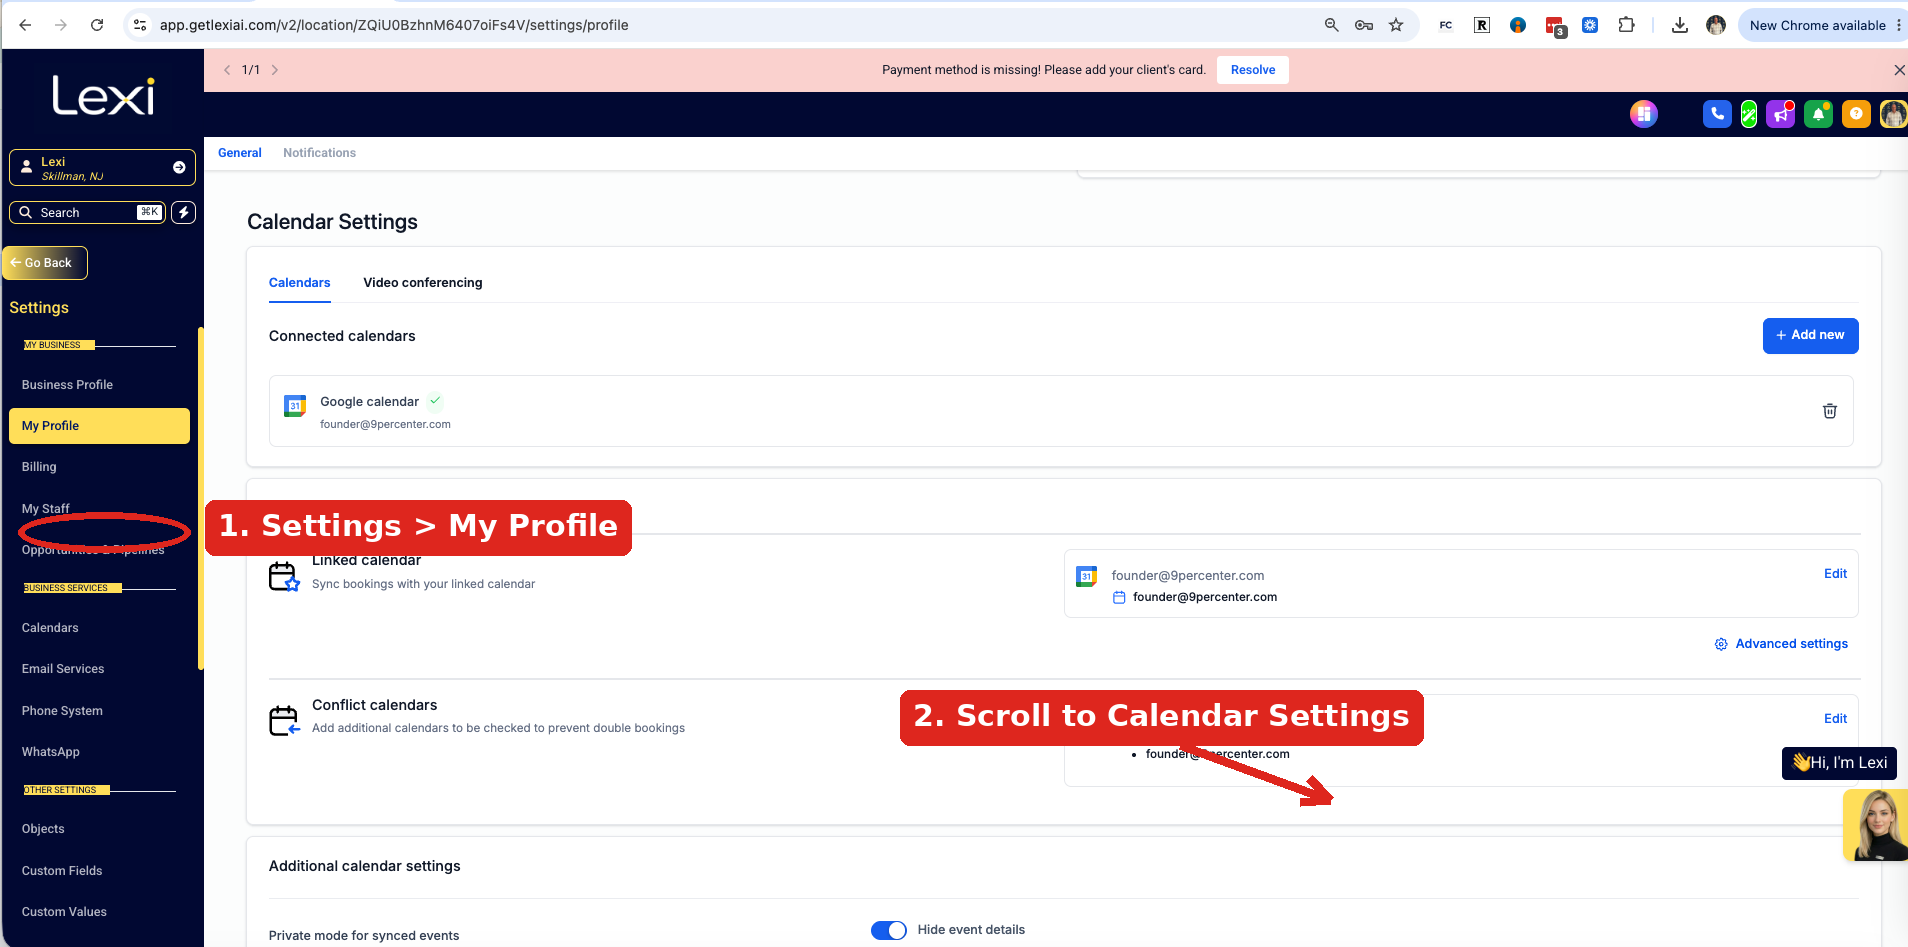 Tap to enlarge · Settings, then My Profile, then Calendar Settings
Choose Google, Outlook, or iCloud. You'll then be handed over to their sign-in page — Google's, Microsoft's, or Apple's — not ours.
- Log in there with the account you actually work from.
- If you keep work and personal calendars separate, pick the work one.
- Approve the connection when it asks.
You're signing in on their site, so we never see your password.
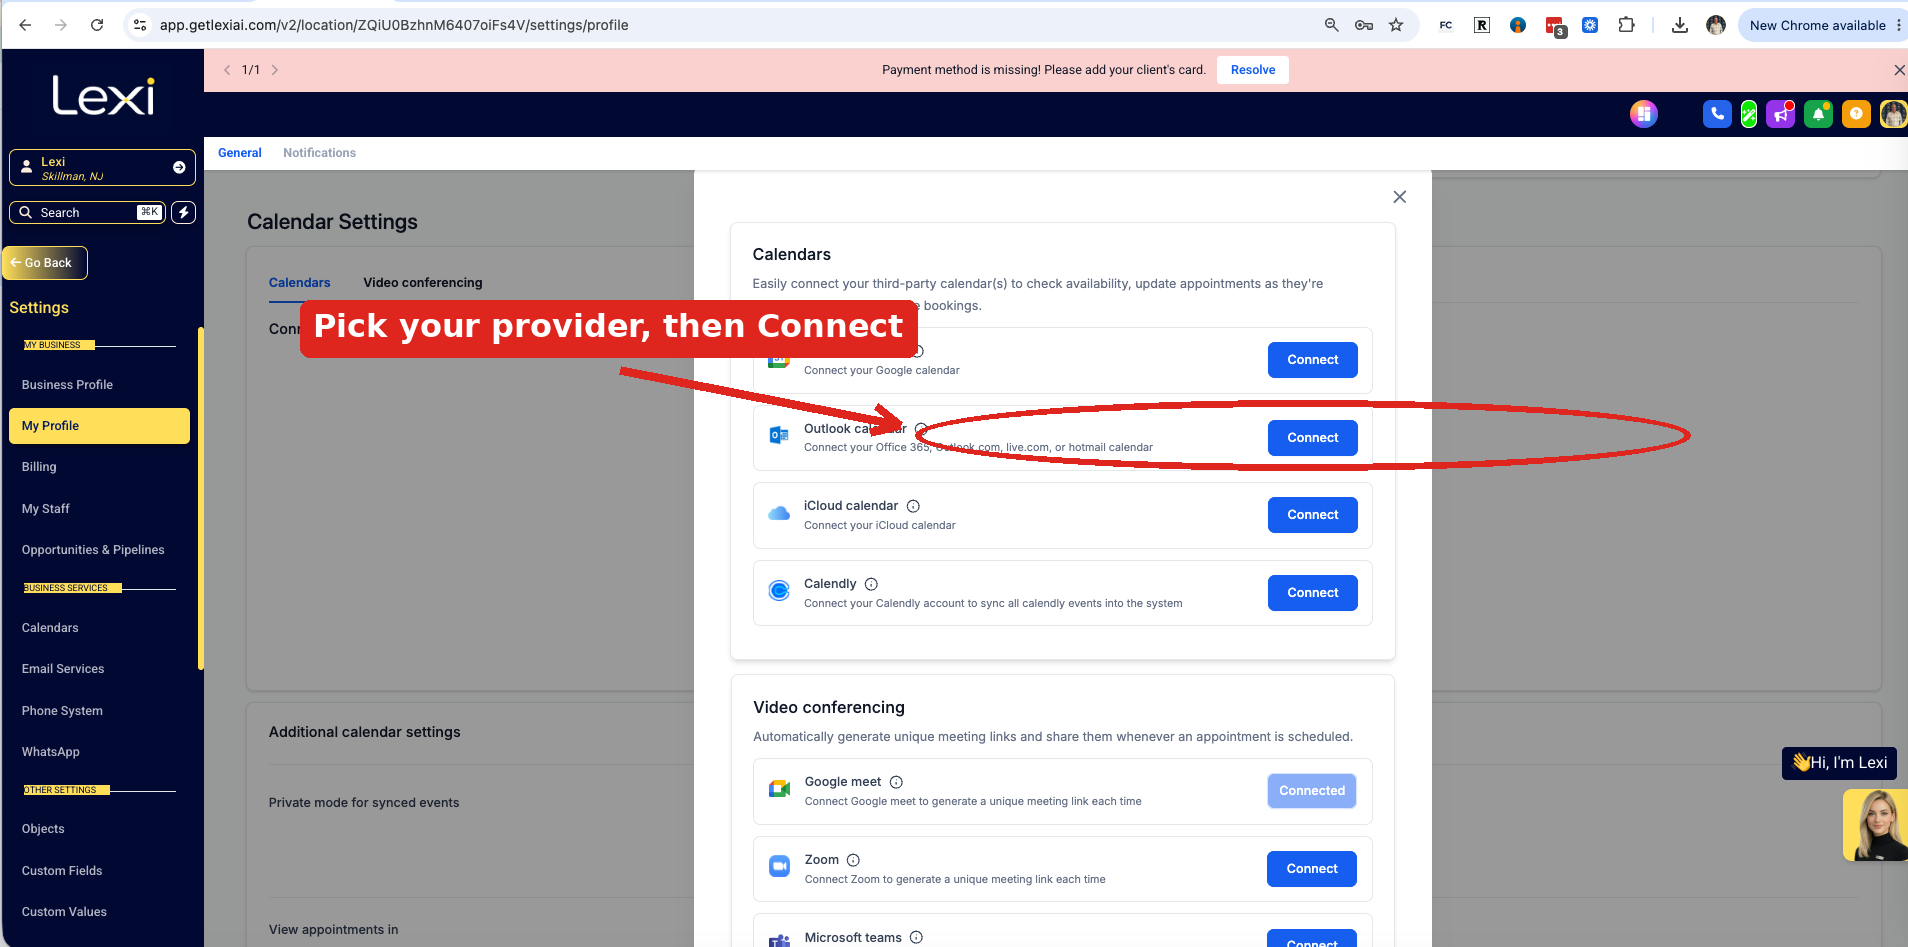 Tap to enlarge · Pick your provider and click Connect
Google shows a list of permissions with tick boxes. It's tempting to leave some off.
- Leave them all ticked.
- Lexi needs to write to your calendar, not just read it.
- Leave one off and it looks connected but never syncs — worse than not connecting, because you'd trust it.
Back on that screen, two boxes should now show your email address:
- Linked calendar — where Lexi writes her bookings.
- Conflict calendars — what she reads to see you're already busy.
If conflict is empty she'll keep double-booking you, even though everything looks connected.
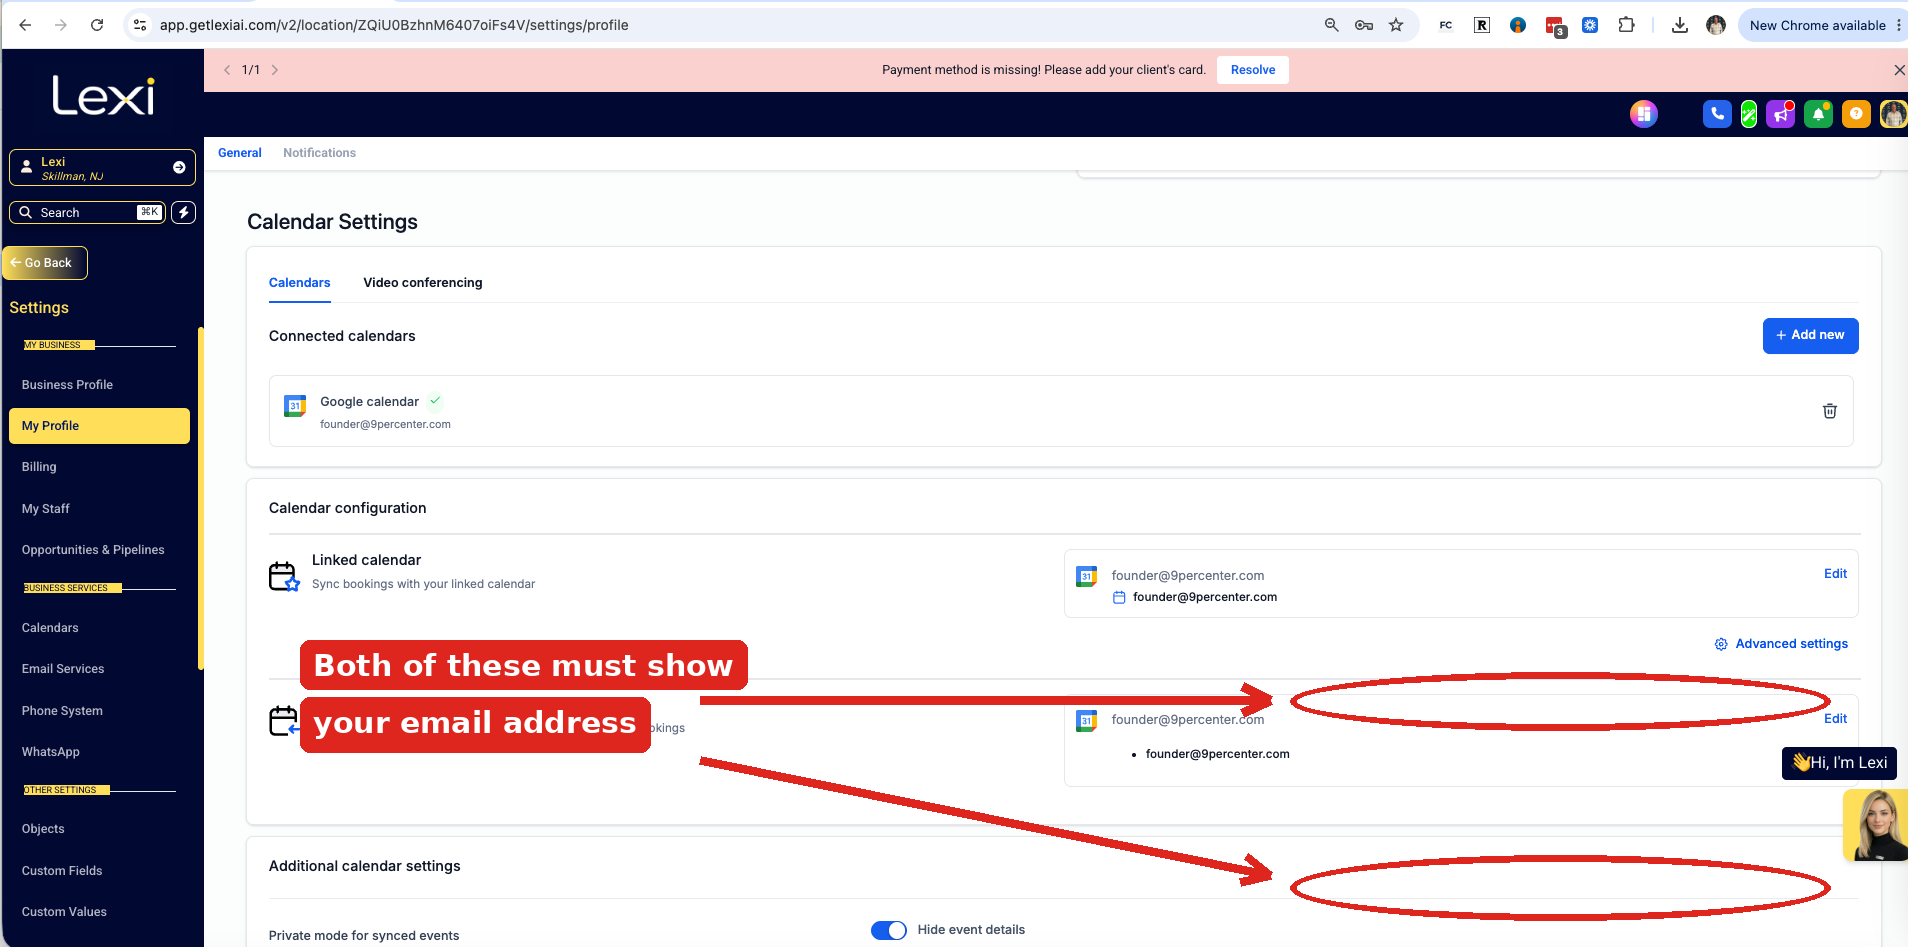 Tap to enlarge · Both boxes should show your email address
Want to be sure it worked?
Put something in your own calendar for tomorrow, then open your booking link. That time should have disappeared. If it's still offered, your conflict calendar isn't set.
More than one person taking bookings?
Each person connects their own calendar — it's tied to the individual, not the business. One person doing it doesn't cover everyone else.
Sync your email
Connect your own domain so Lexi's emails come from your business. It's the single biggest thing you can do to make sure they land in the inbox.
What this gives you
Lexi's emails go out from your own business address. Inbox providers trust your domain, so more of her follow-ups and campaigns reach people instead of getting filtered.
- On Cloudflare? About two minutes, and it's done for you.
- Anywhere else? About ten minutes of copying and pasting.
In your back office, scroll to the very bottom of the left menu and click Settings. It's the last item, below everything else.
Tap to enlarge · Settings sits at the very bottom of the left menu
Click Email Services. A panel appears offering you a dedicated sending domain — click Create Dedicated Domain.
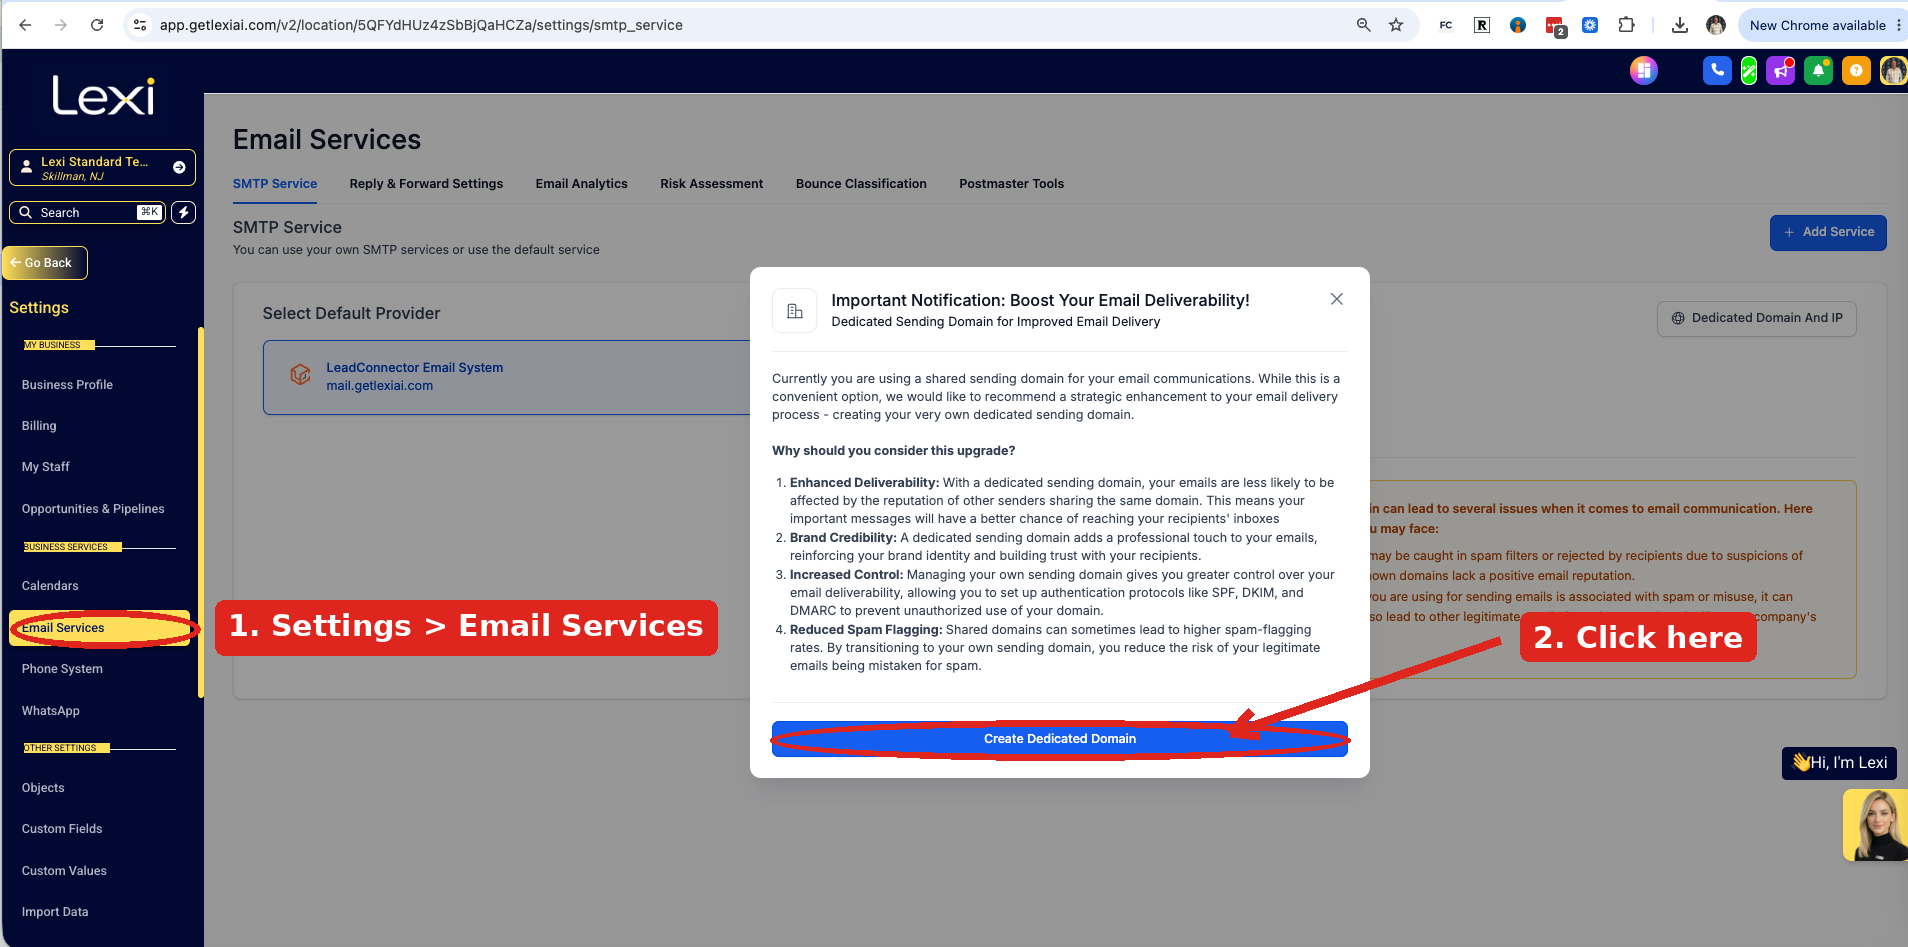 Tap to enlarge · Email Services, then Create Dedicated Domain
So if your website is www.yourdomain.com, you type:
All lowercase, no www, nothing else. A green "Looks good" message appears when it's right. Then click Add & Verify.
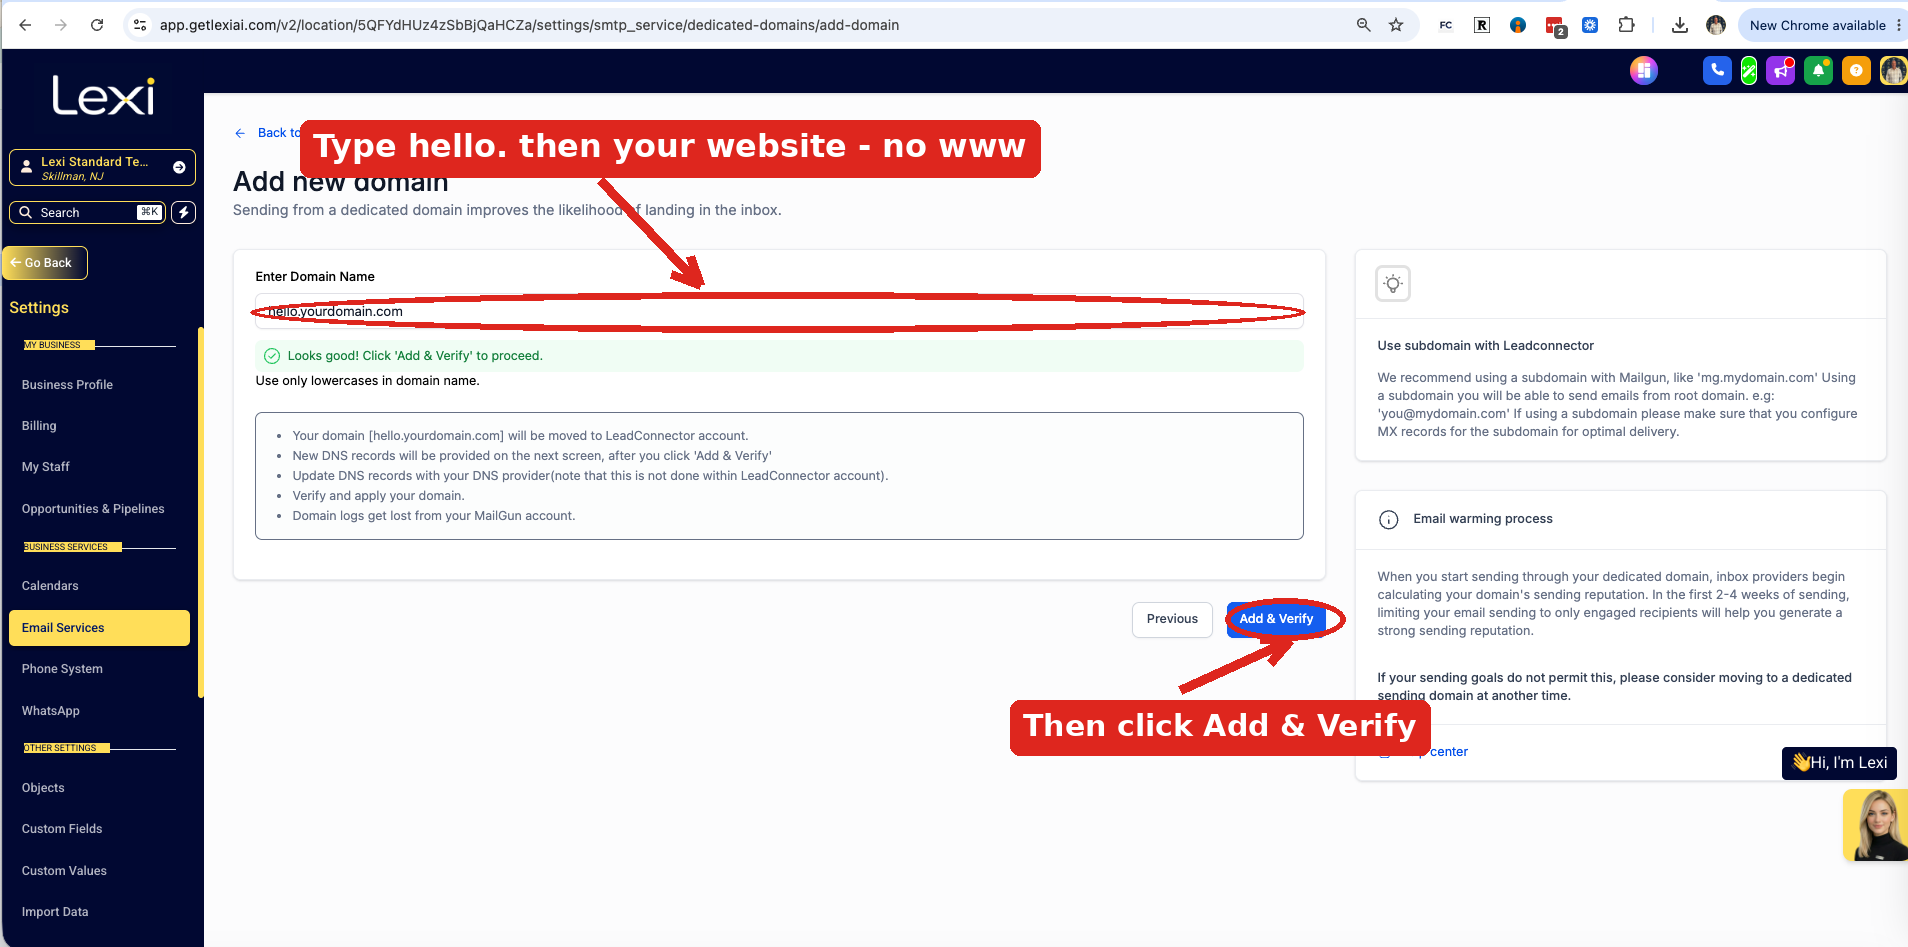 Tap to enlarge · Type hello. then your website, with no www
It spends a few seconds working out where your website is registered. What happens next depends on the answer.
You're in luck. Click Authorize domain and you'll be handed over to Cloudflare's own sign-in page.
- Log in to Cloudflare with the account that holds your domain.
- Approve the change when it asks.
- That's it — the records get added for you. Skip to E.
You're signing in on Cloudflare's site, so we never see your password.
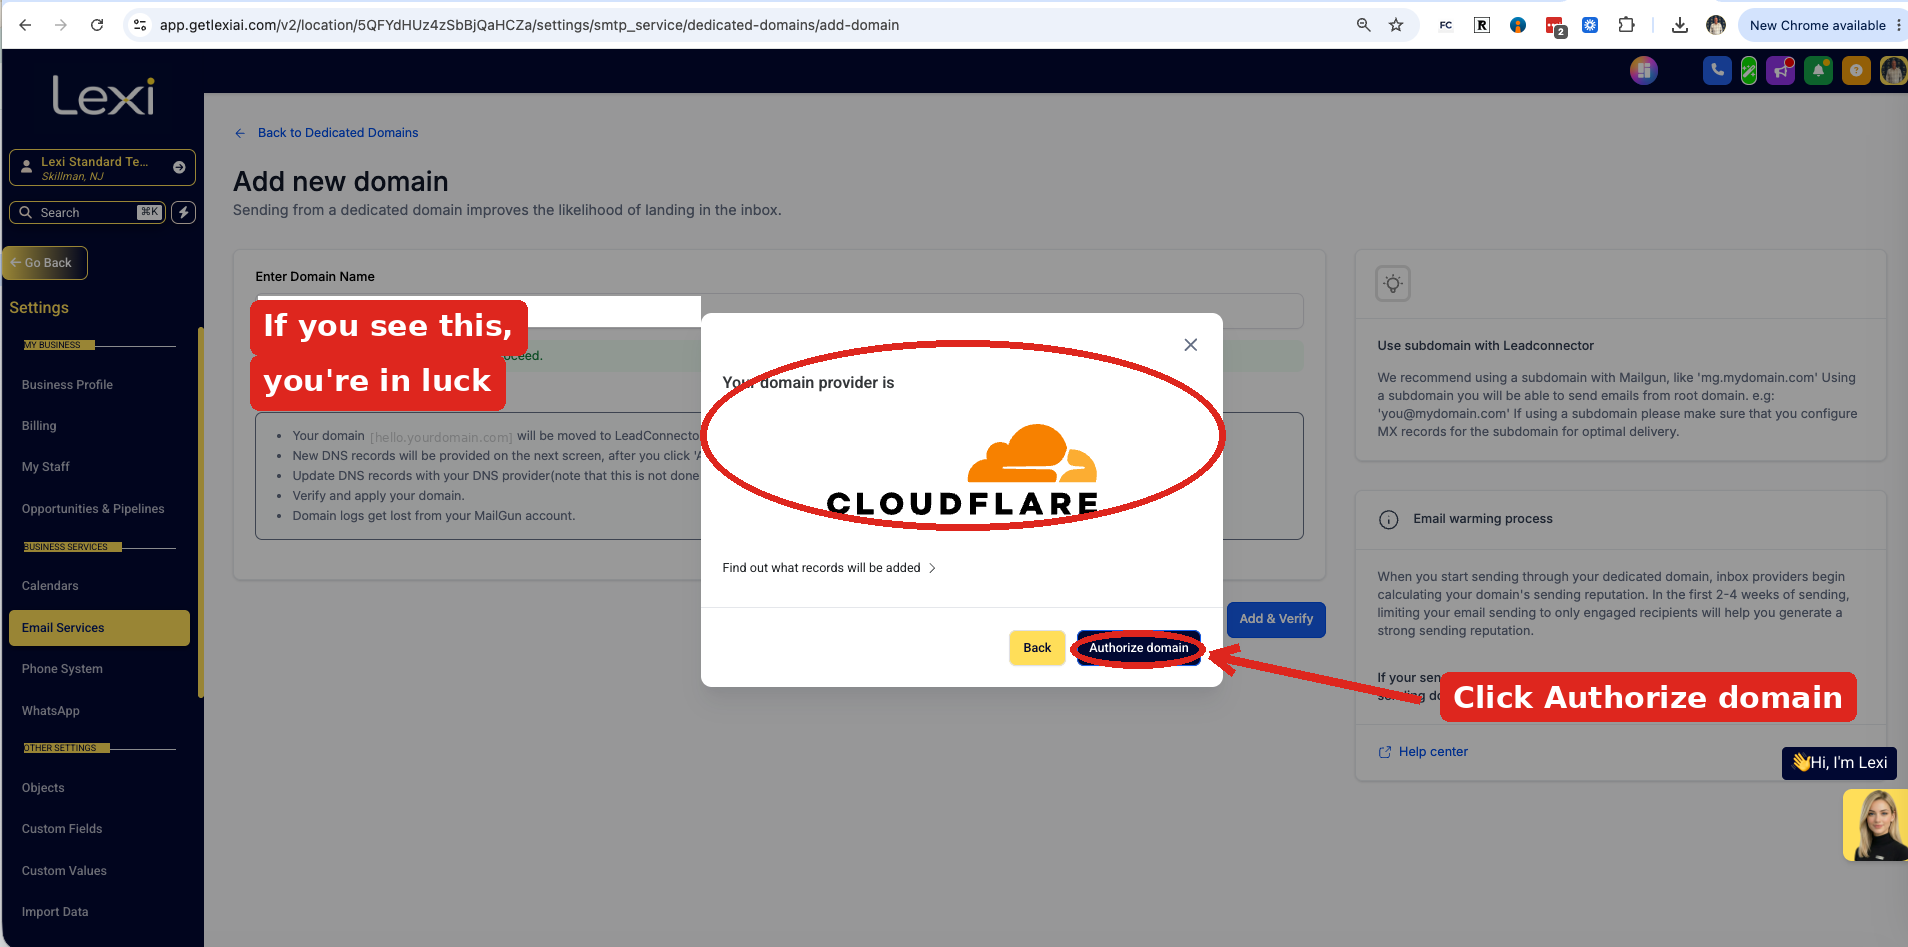 Tap to enlarge · Cloudflare found - just click Authorize domain
Click Add record manually. You'll get five records, each with a copy button.
- Open your domain provider in another tab.
- Find their DNS settings.
- Add all five records.
Prefer to watch? There's a help video right on that screen.
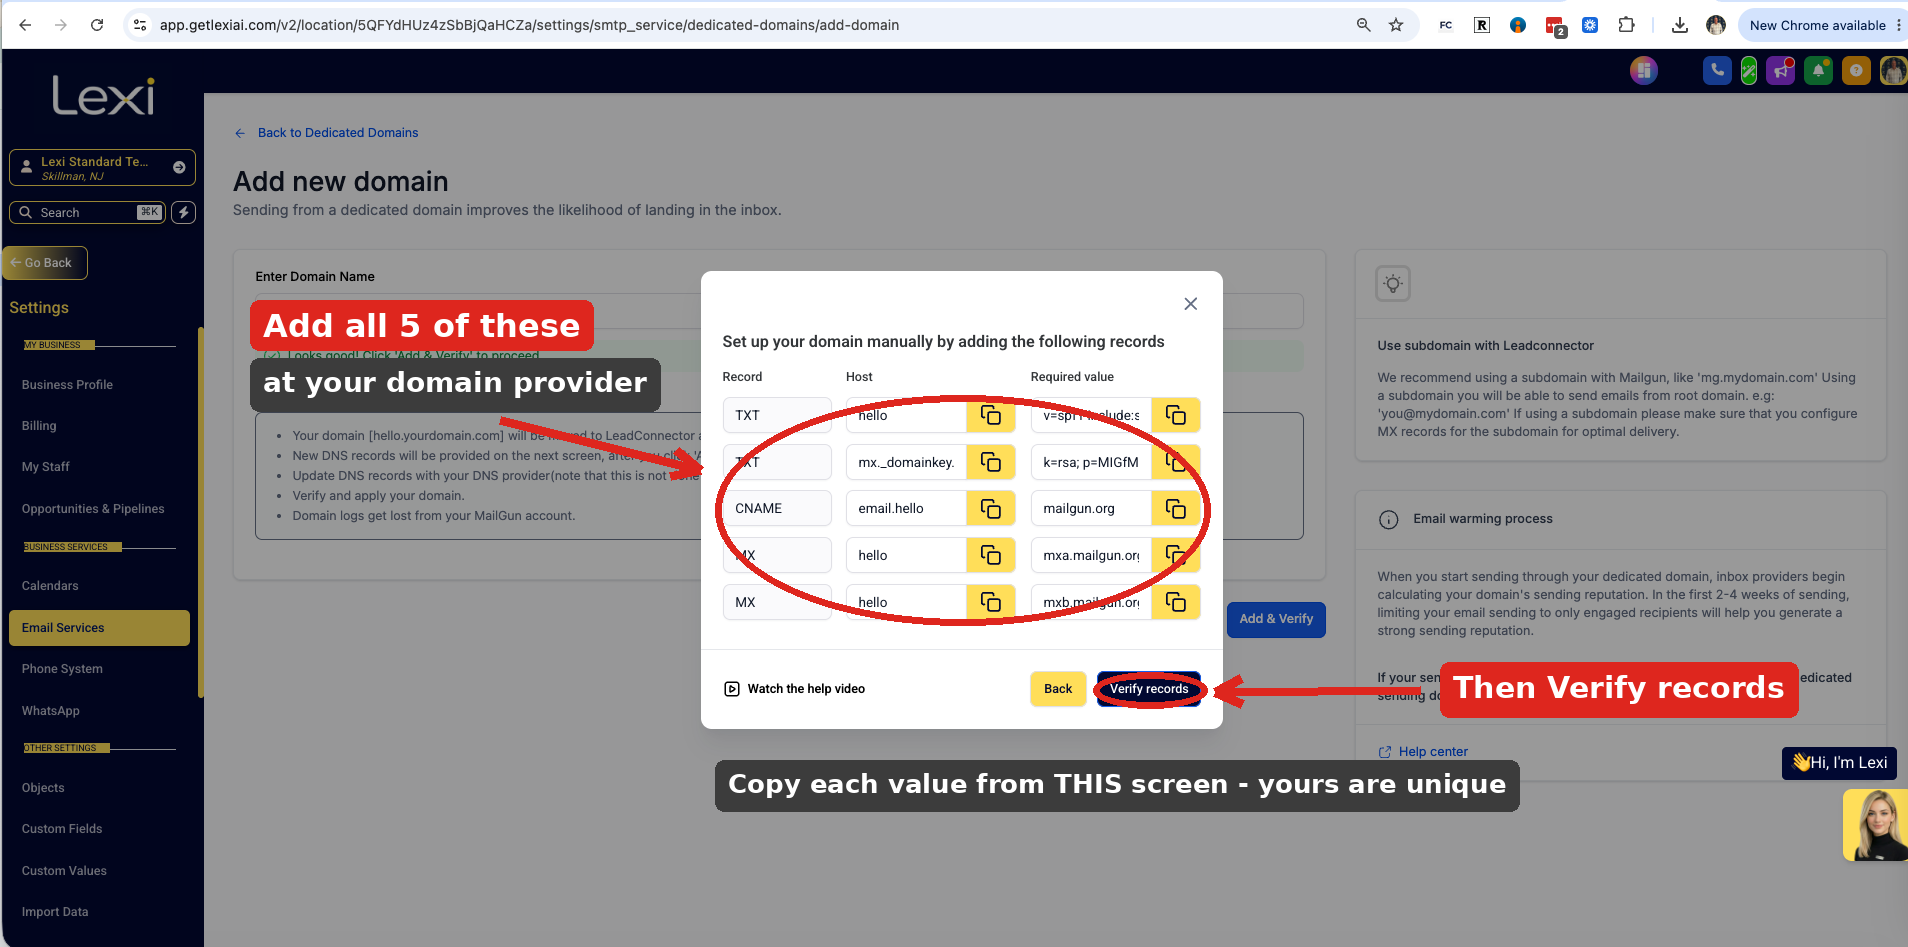 Tap to enlarge · The five records, then Verify records
Back in your back office, click Verify records. If some don't go green straight away that's normal — domain changes take a few minutes to spread. Wait a bit and click it again. Once they're all green you're done, and you never touch it again.
Not sure who runs your domain?
It's whoever you bought your website address from — GoDaddy, Namecheap, Squarespace, Google, or your web designer. If a designer built your site, forward them this step and they'll know exactly what to do in about five minutes.
Worth knowing about Cloudflare
Cloudflare is free, and moving your domain there turns this step from ten minutes of copying into two clicks. It's also faster and safer than most providers. It's what we use ourselves, and what we'd recommend to anyone building or moving a site — we think it's the best there is.
Forward your number to Lexi
Optional — only if you already have a business number.
Lexi has her own number and it's working right now. If your customers already know a different number, you can point that one at Lexi so she picks up those calls too. Nothing changes for the people calling you.
It's called call forwarding. Most people can do it themselves in under a minute — find your setup below.
- Open Settings → Phone → Call Forwarding. On newer iPhones it's Settings → Apps → Phone → Call Forwarding.
- Turn it on.
- Enter your Lexi number, shown at the top of this page.
To undo it, come back and switch it off.
- Open the Phone app.
- Tap the three dots, then Settings → Calls → Call forwarding.
- Choose Always forward and enter your Lexi number.
The exact wording moves around a bit between phone makers, but it's always under Calls.
- Pick up that phone and dial *72 followed straight by your Lexi number — no spaces or dashes.
- Wait for the confirmation beeps.
- To undo it later, dial *73 from the same phone.
Works on Verizon, Spectrum, Cox, Frontier, CenturyLink and most cable and landline providers.
You're most likely on AT&T or T-Mobile mobile, which use different codes:
- AT&T — dial *21* then your Lexi number then #, and press call. To undo it, dial #21#.
- T-Mobile — dial **21* then your Lexi number then #, and press call. To undo it, dial ##21#.
If neither takes, dial ##002# — that clears every kind of forwarding on any carrier.
If your number is with Google Voice, RingCentral, Vonage or similar, forwarding lives in their website settings instead — look for Call Handling or Call Forwarding.
Ring your old number from a different phone. Lexi should answer. That's the only check that matters — if she doesn't pick up, the forward didn't take.
Need more help?
Just call your phone company and ask them to forward all calls on this line to another number. Give them your Lexi number when they ask — takes about five minutes, and they don't usually charge for it.
Rather just use your Lexi number?
That's completely fine, and it's simpler. Put the Lexi number on your website, your listings and your ads, and skip this step. Plenty of customers do exactly that.
Switch Lexi on
Two things to do and Lexi starts working inside your own account. You only do this once.
Load Lexi into your account
This puts Lexi's setup file into your GoHighLevel account. It takes about two minutes and you only do it once.
There are two parts here, and both are required:
- A. Import the file into GoHighLevel.
- B. Load it into the account you work in.
This is what gives Lexi the ability to follow up, confirm appointments, and send reminders. Without it she can still answer when spoken to, but the rest stays switched off. Don't worry — it's very simple, and we'll tell you the moment it's done.
Open GoHighLevel in another tab, click the button below, and confirm the import. The file lands in your snapshot list.
This is the part people skip, and importing on its own does nothing. Now apply that file to the account you actually work in. In GoHighLevel:
- Open Sub-Accounts
- Click the three dots next to your account
- Choose Manage Client
- Open Actions
- Choose Load Snapshot, and pick Lexi Connect Only
Pick the account you bought Lexi for. Loading her into a different one won't switch anything on.
Don't see "Load Snapshot" in the Actions menu?
Nothing is broken — your user just doesn't have snapshot access switched on yet. Go to User → Roles and Permissions, turn Snapshots on for your user, then try again.
We've opened GoHighLevel in a new tab. Go and load Lexi's setup file there, then come straight back to this page to finish — there are two quick questions left and then you're live.
Where should Lexi book appointments?
Pick the calendar you want new bookings to land on. Lexi will only ever book on this one, and you can change it whenever you like.
Where should Lexi put new leads?
Pick the board you use to track leads. Every new lead Lexi finds goes straight into the first stage, so nothing slips through.
About your texting
Good news first — your Lexi number is live and taking calls right now.
Texting is the only thing we're waiting on. Every business that sends texts has to be registered with the phone carriers first — that's called A2P — and they take two to four weeks to approve it.
We're not making you wait that long. You'll have a temporary number sending texts within three to four business days, and there's nothing you'll have to do — we handle it all, so it just works the moment it's ready. When your permanent number clears, we swap it over for you.
Nothing for you to do. We handle all of it.
Sometimes the carriers ask us to confirm your business with the IRS. If you've got that letter handy, sending it now can cut a week or two off the wait.
It's the letter the IRS sent when they issued your EIN — headed CP 575, or 147C if you asked for a replacement. Some people call it their SS-4. A photo works.
A photo or a PDF is fine. Don't have it to hand? Skip it — this is genuinely optional.